 Naqood
How to create your first invoice in Naqood
An invoice tells your customer what they bought, what it costs, and when to pay. If your business is VAT registered, Naqood creates it as a tax invoice with VAT calculated on every line.
This guide walks you through your first invoice from a blank form to an approved invoice you can download or send. The trickiest part for most new users is the line items, so that section has the most detail.
This guide uses a simple Dubai example: an invoice dated 04/11/2026 to Dubai Mug Customer for 50 Branded ceramic mugs at AED 18.00 each, with a 10% discount and 5% VAT. The total is AED 850.50, due in 30 days on 04/12/2026.
Where do you start a new invoice?
You can start from the dashboard or from the invoices list.
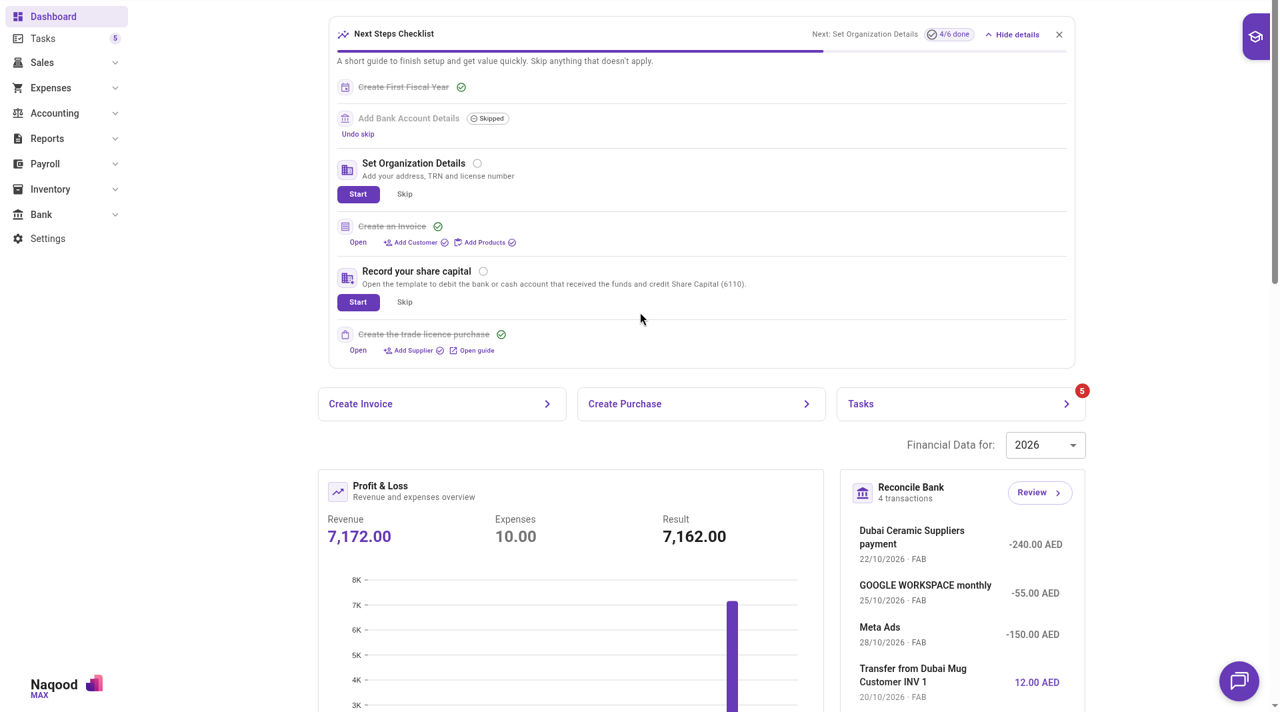
- On the dashboard, click Create Invoice. It sits next to Create Purchase and Tasks.
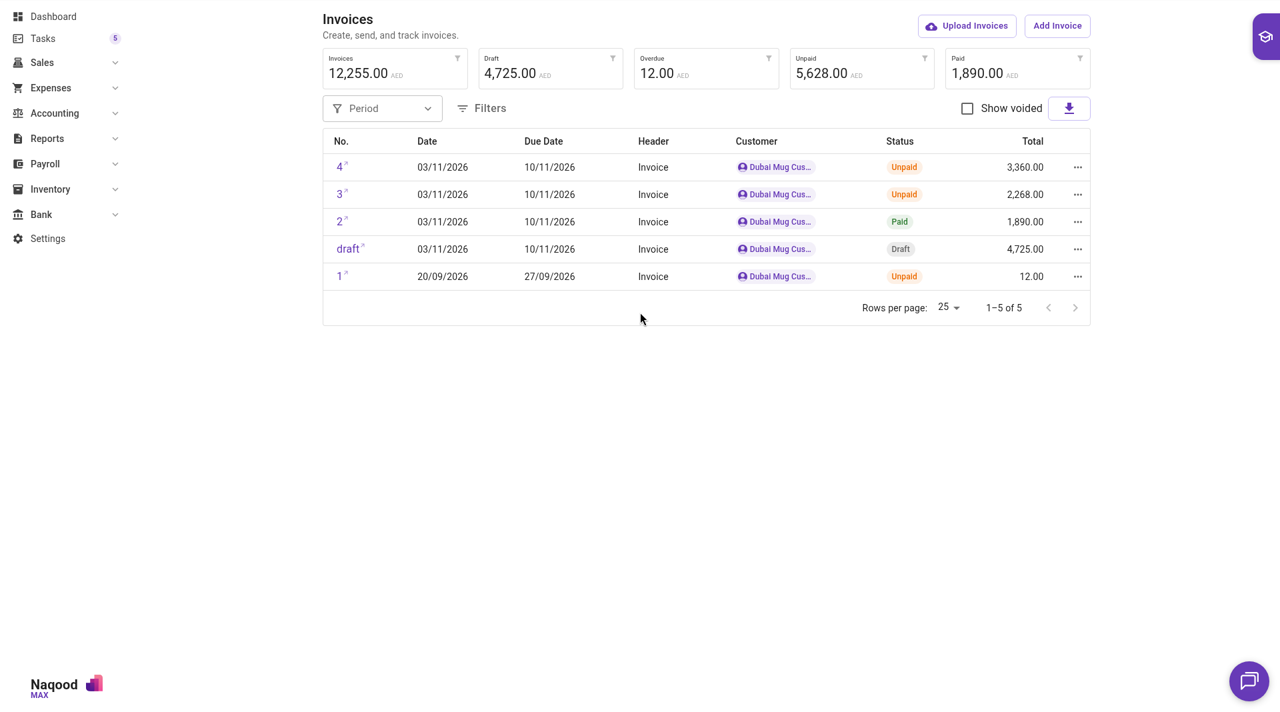
- Or go to Sales → Invoices and click Add Invoice. (Upload Invoices is for importing invoices you already have.)
Naqood opens a blank New Invoice form. The Invoice Title is TAX INVOICE by default, the Header is Invoice, and the number shows Invoice No: draft until you approve.
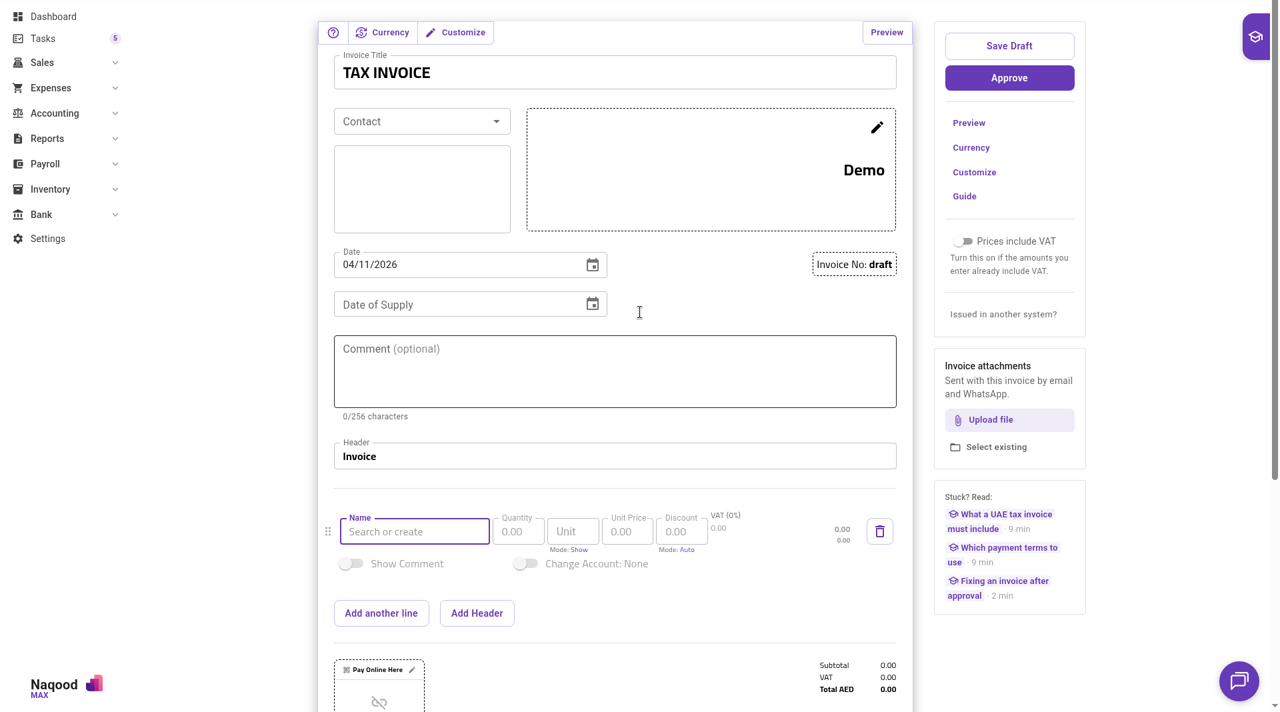
The form has these fields at the top:
- Contact: the customer you are billing
- Date: the invoice date
- Date of Supply: when you delivered the goods or service
- Comment (optional): an optional note
The right panel holds Save Draft and Approve, plus the links Preview, Currency, Customize, and Guide.
How do you pick or add a customer?
- Click the Contact field.
- Pick an existing customer from the list, for example Dubai Mug Customer.
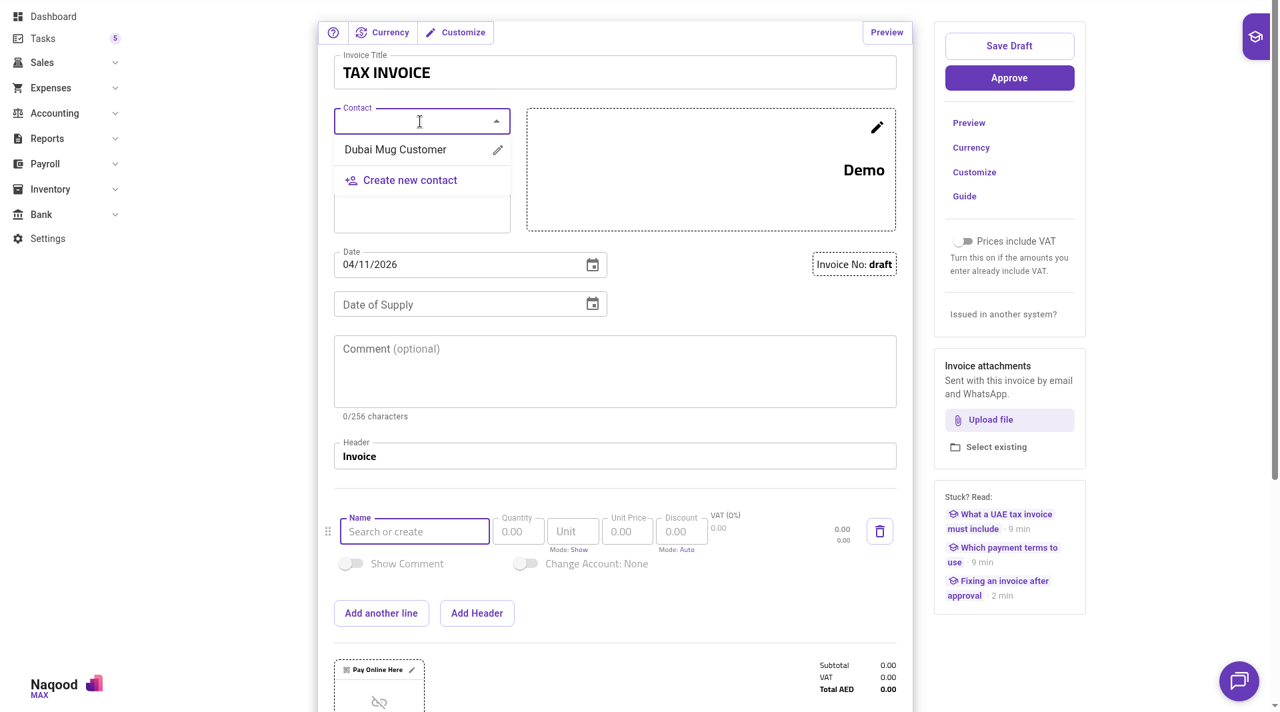
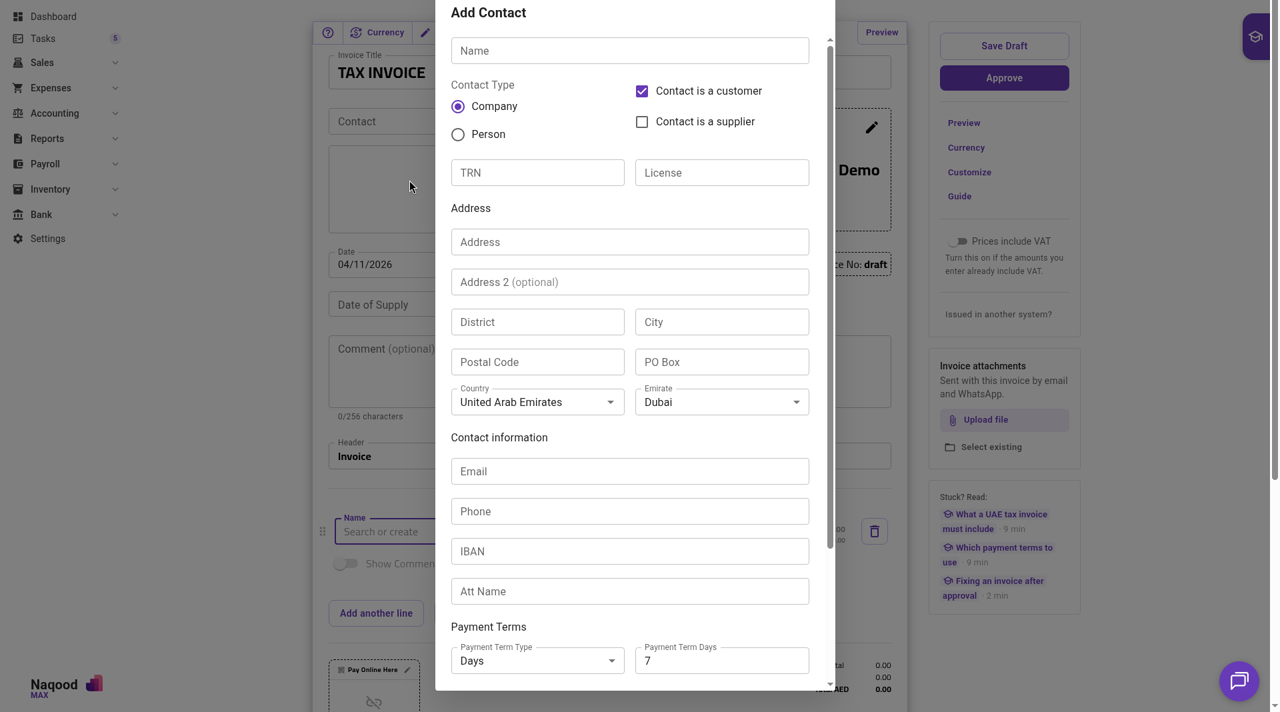
If the customer is new, click Create new contact. The Add Contact dialog opens.
- Enter the Name.
- Tick Contact is a customer. Tick Contact is a supplier too if you also buy from them.
- Choose the Contact Type: Company or Person.
- Enter the customer’s TRN if they are VAT registered, plus their License, address, Country, Emirate, Email, and Phone.
- Optionally set Payment Term Type, Payment Term Days, Default Account, Default VAT code, and Default Currency so future invoices fill in faster.
- Click Add.
How do you add line items?
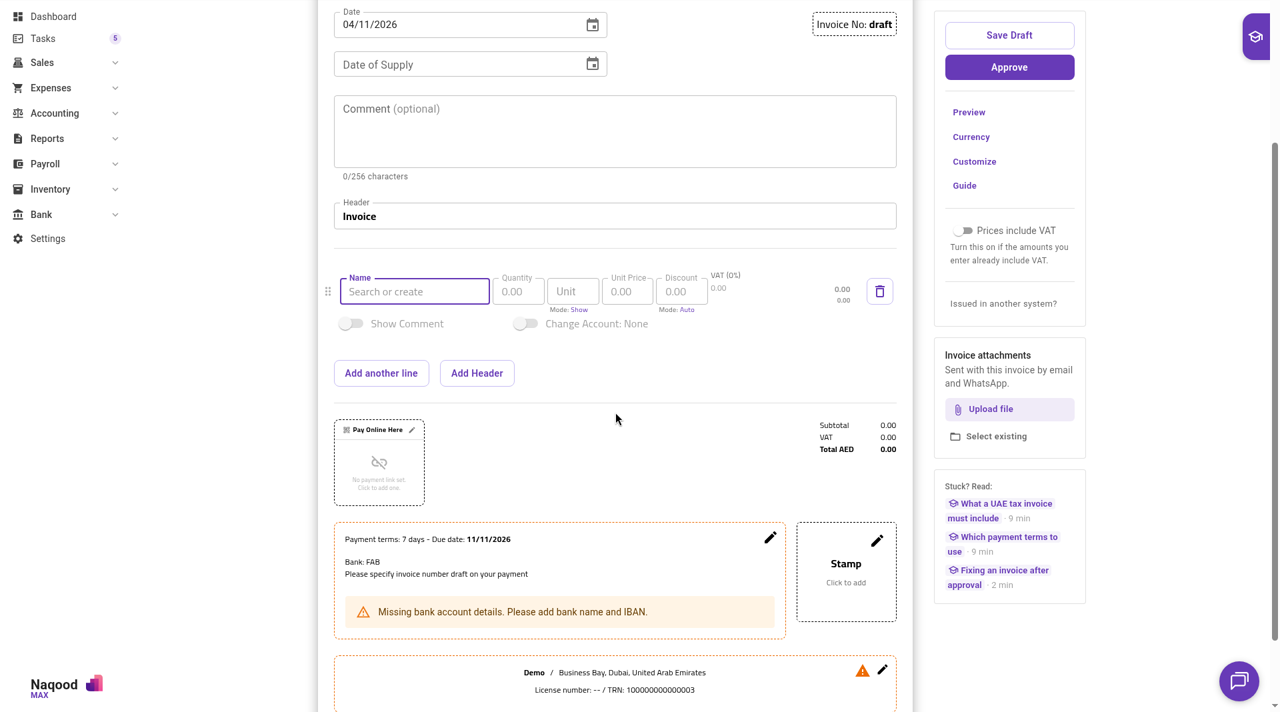
Each line on the invoice is one product or service. The key rule: pick the item first. Until you do, the other fields on the line stay greyed out.
- Look at the empty line. The Name field reads Search or create, and Quantity, Unit, Unit Price, and Discount are greyed out. The VAT caption shows VAT (0%) until you pick an item.
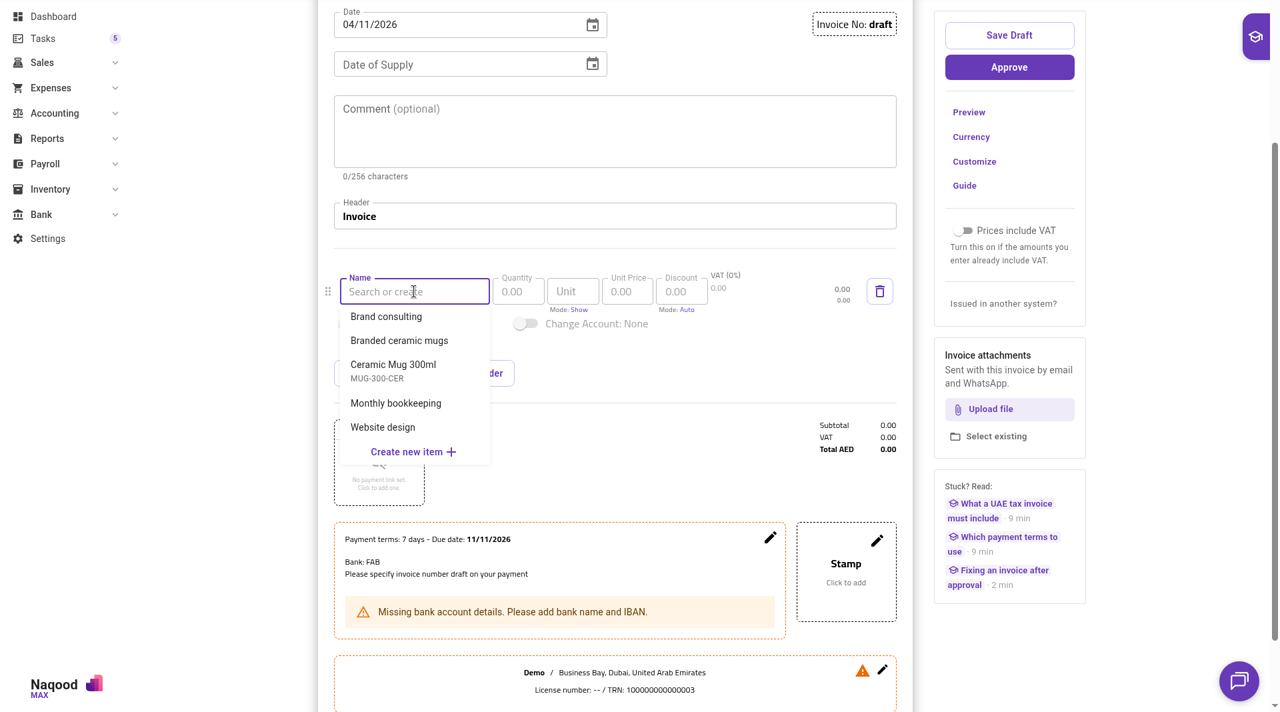
- Click Name and pick an item from the list, for example Branded ceramic mugs. Your saved items appear here.
- If the item is not in the list, type its name and choose Create new item + to create it on the spot.
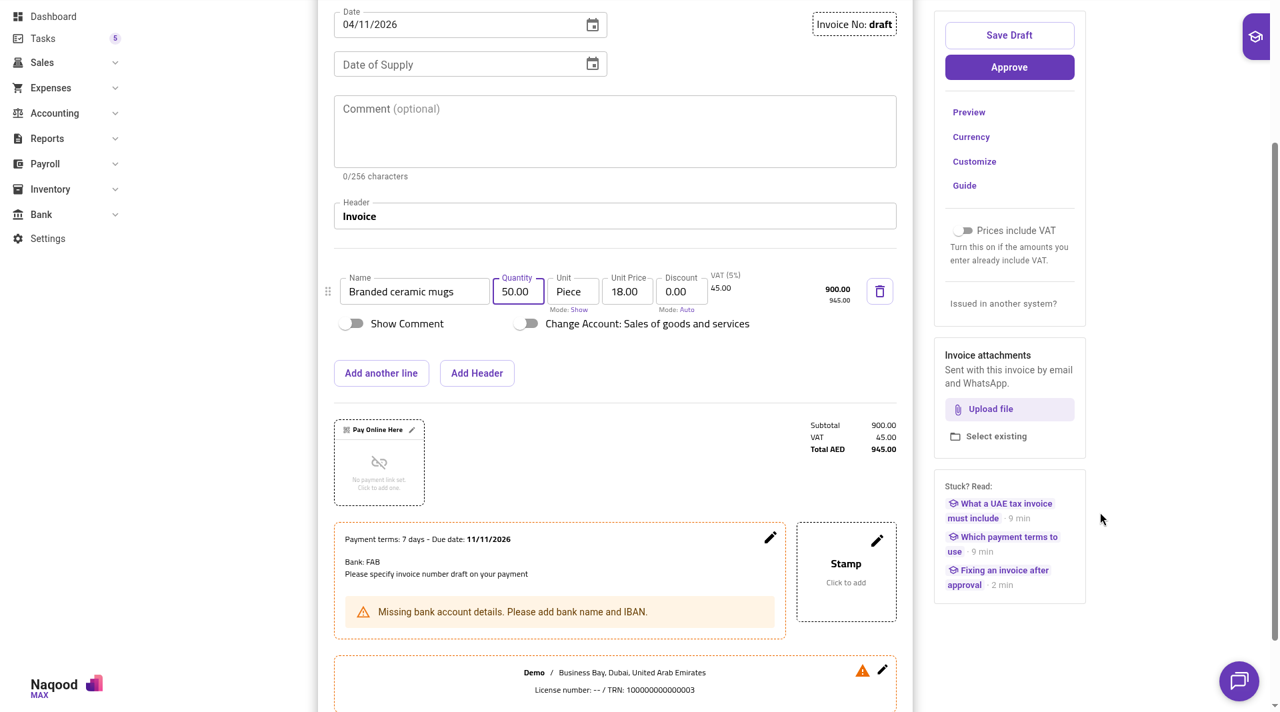
- Naqood fills in the line from the item. In the example, it fills Quantity 120, Unit Piece, and Unit Price 18.00, and the caption changes to VAT (5%). Quantity, Unit, Unit Price, and Discount are now editable.
- Change Quantity to what you are billing. In the example, change it to 50. The totals update to 900.00, VAT 45.00, and 945.00.
- To give a discount, enter a number in Discount. It is a percentage of the line. In the example, 10 means 10% off: the line becomes 810.00, Subtotal 810.00, VAT 40.50, and the total AED 850.50.
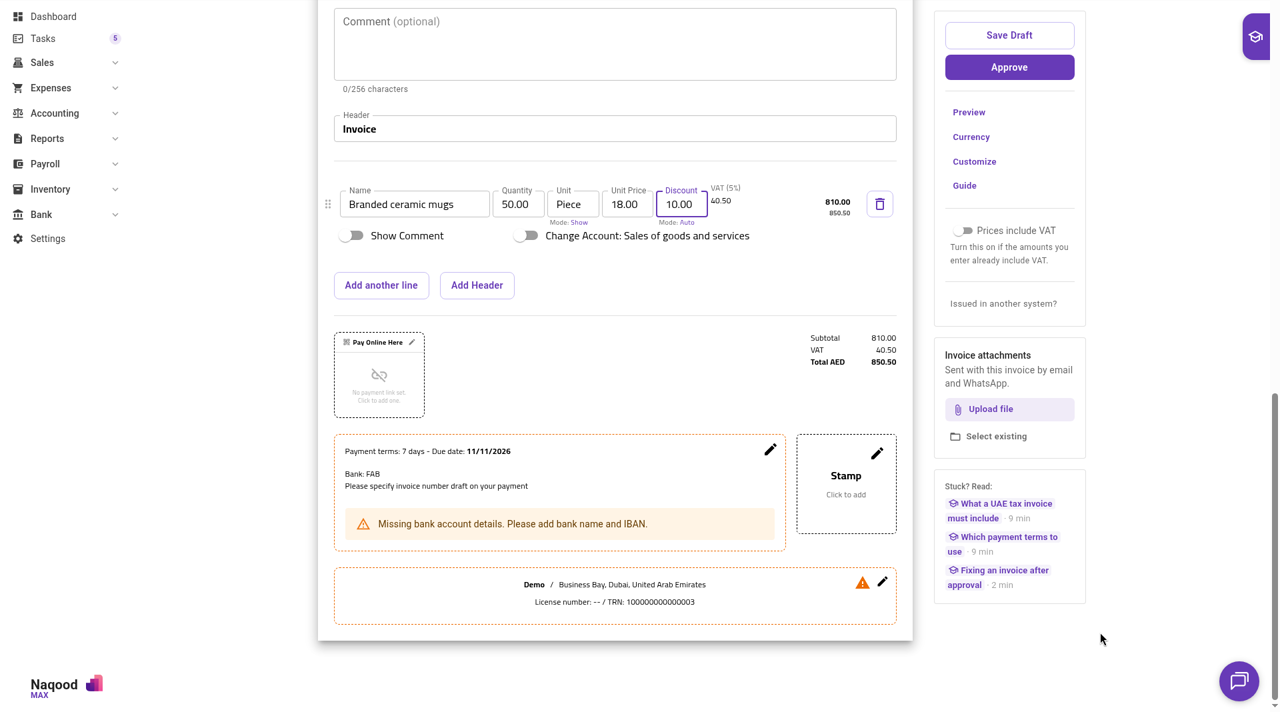
- Click Add another line for the next item, or Add Header to group lines under a heading.
How VAT works on a line:
- The VAT rate is not a dropdown. Each line uses your organization’s rate: 5% once you are VAT registered, and 0% if you are not registered or the invoice date is before your registration date.
- Prices include VAT is off by default, so the prices you enter are VAT exclusive and Naqood adds VAT on top. Turn it on only if the amounts you enter already include VAT.
How do you set payment terms and the due date?
Payment terms tell the customer how long they have to pay. The due date is the last day to pay, and Naqood calculates it from the terms. You do not type it.
- Find the payment terms box, for example Payment terms: 7 days - Due date: 11/11/2026.
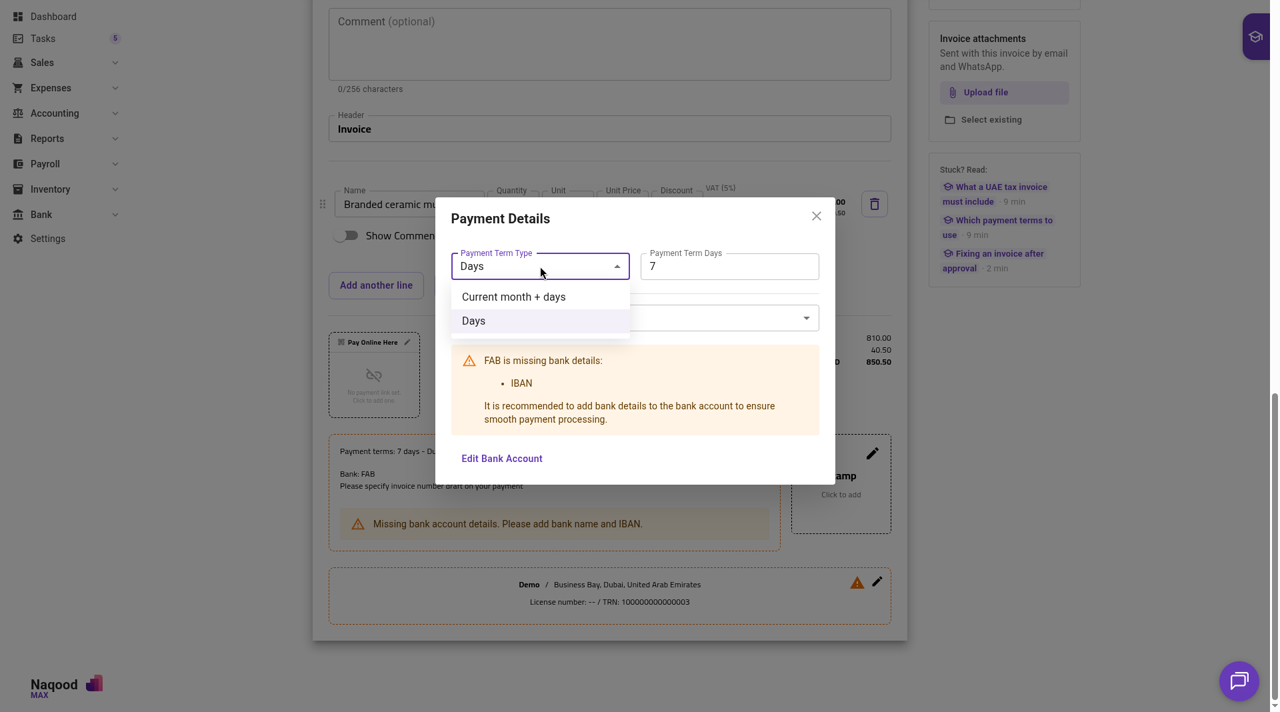
- Click the pencil icon. The Payment Details dialog opens.
- Under Payment Term Type, choose Days (a number of days from the invoice date). The other option is Current month + days.
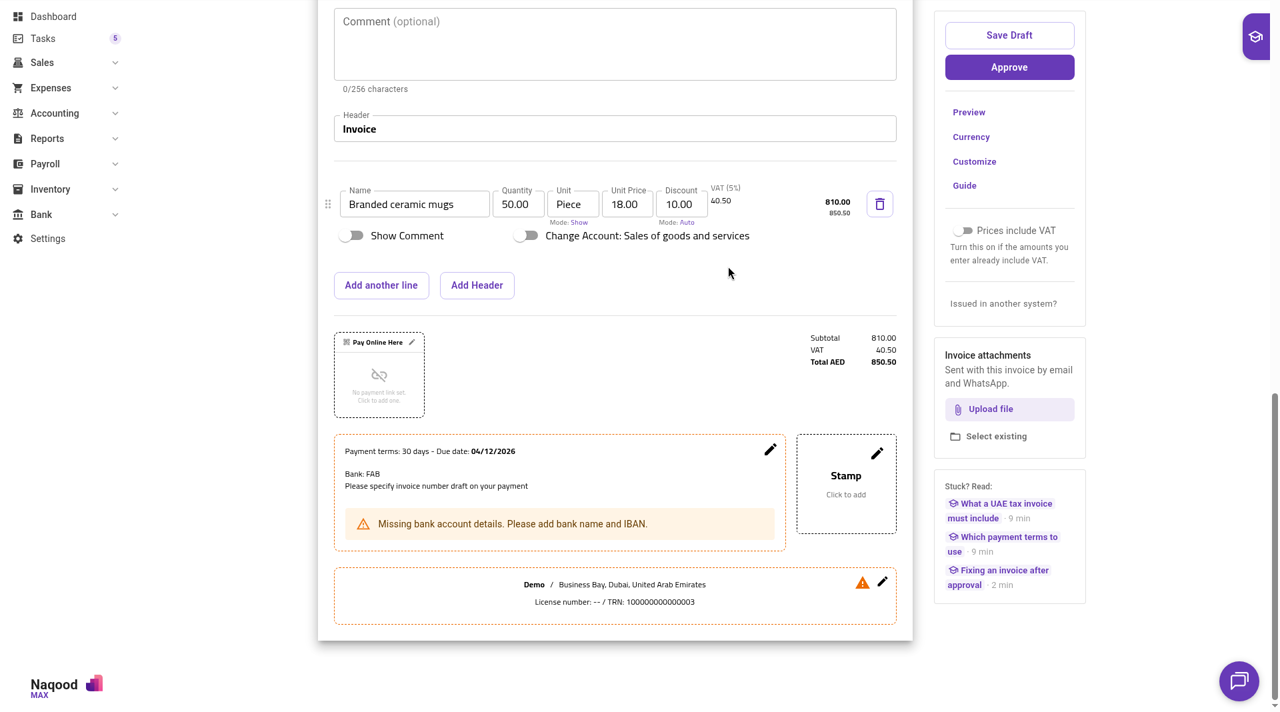
- Enter the Payment Term Days, for example 30.
- Check the Bank Account your customer should pay into. Use Edit Bank Account to add a bank name or IBAN.
The box now reads Payment terms: 30 days - Due date: 04/12/2026.
If the bank account has no IBAN, the form shows Missing bank account details. Please add bank name and IBAN.
How do you preview, approve, and send the invoice?
- Click Preview in the right panel to see the invoice exactly as your customer will.
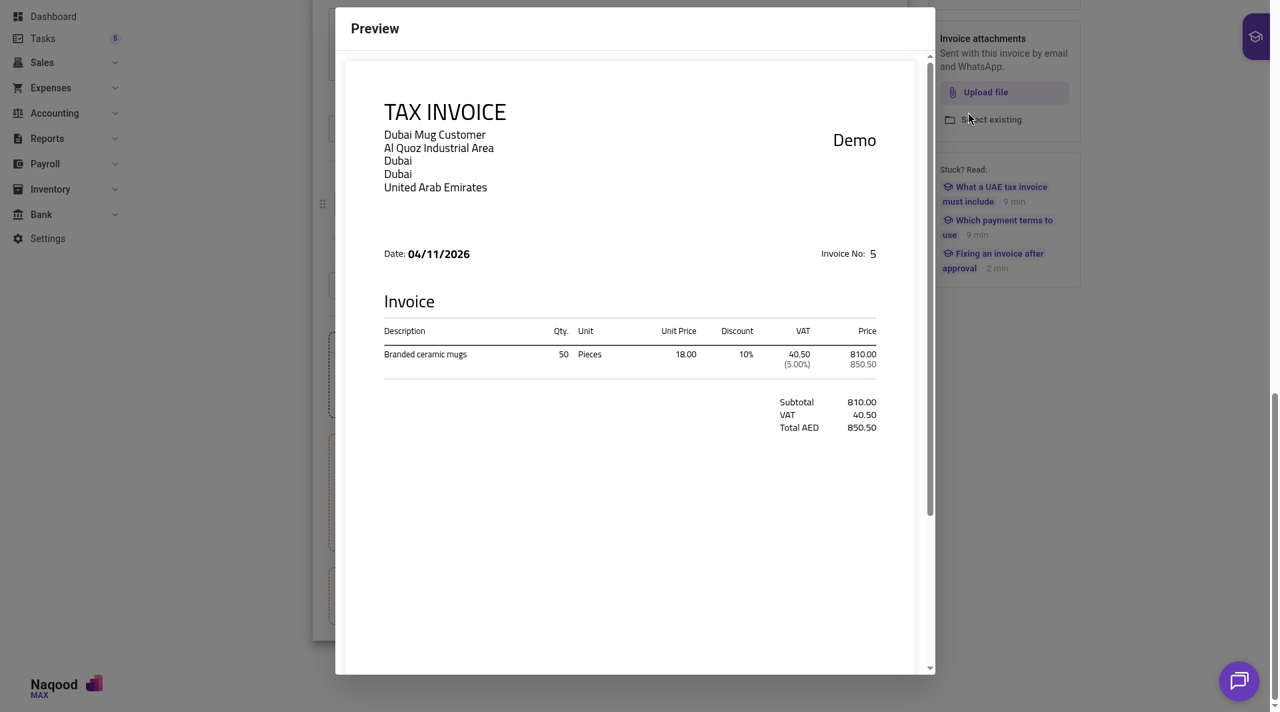
- Close the preview and choose:
- Save Draft to keep the invoice editable. It has no number yet.
- Approve to finalize it. The invoice gets the next number, and Invoice No: draft becomes that number.
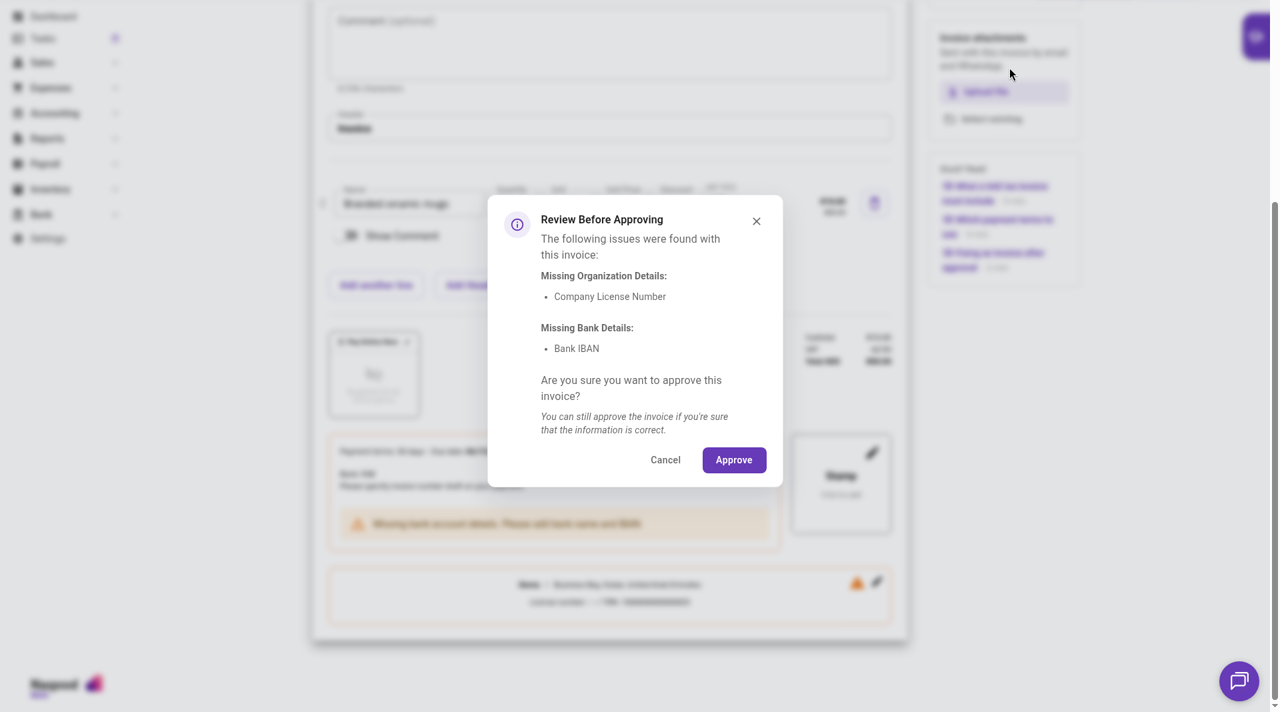
- If details are missing, Naqood shows Review Before Approving with a list of issues, for example Missing Organization Details: Company License Number or Missing Bank Details: Bank IBAN. Click Cancel to fix them, or Approve if you are sure the information is correct.
- After approval, the Send Invoice dialog opens. Turn on Email, click + Add email, enter the customer’s address, and click Send. You can also close the dialog and send later with Send on the invoice page.
The approved invoice shows the status Unpaid and a banner such as You still have to register payment of 850.50 AED for this invoice. The buttons above it are Send, Edit, Register Payment, and Send Notice. Click the download icon in the PDF block to save the invoice PDF.
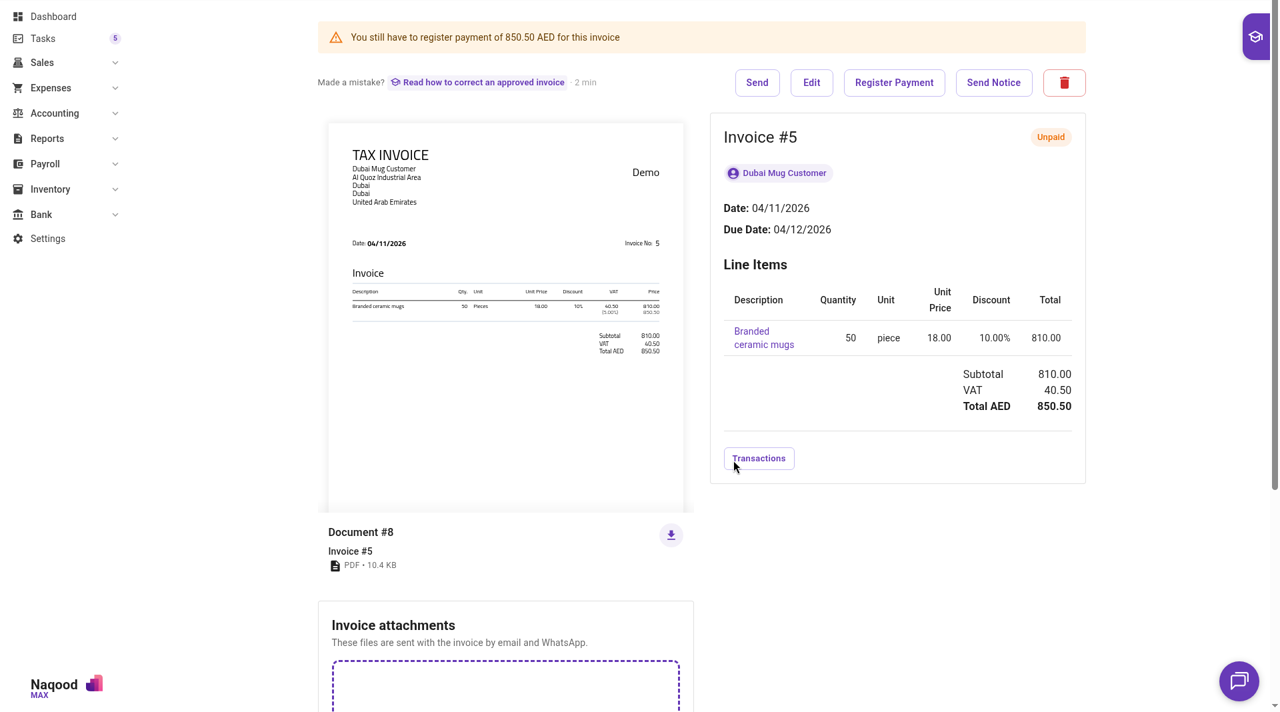
An approved invoice can’t be freely edited. To fix one, see how to correct an approved invoice. If the customer pays late, see how to send invoice payment notices.
What are the common mistakes on a first invoice?
- Quantity and price are greyed out. You have not picked an item yet. Pick or create the item in Name first.
- VAT is added twice. You entered prices that already include VAT while Prices include VAT is off. Turn it on, or enter prices without VAT.
- Warnings at approval. Review Before Approving lists missing details such as the company license number or bank IBAN. Add them in your organization settings or bank account, or approve anyway if you are sure.
- Customer TRN missing. If your customer is VAT registered, add their TRN to the contact. A tax invoice to a VAT registered business should show it.
Frequently asked questions about creating an invoice in Naqood
How do I create a tax invoice in Naqood?
Click Add Invoice in Sales → Invoices. The Invoice Title is TAX INVOICE by default, and VAT is calculated on each line once your organization is VAT registered.
Why can’t I type a quantity or price?
The line has no item yet. Pick an item in Name, or type a new name to create one. Quantity, Unit, Unit Price, and Discount then unlock.
Why does my line show VAT (0%)?
Your organization is not VAT registered, or the invoice date is before your registration date. VAT registered invoices show VAT (5%).
Is the discount an amount or a percentage?
A percentage. Entering 10 in Discount takes 10% off that line.
Can I change the due date by hand?
No. Naqood calculates it from the payment terms. Click the pencil icon on the payment terms box and change Payment Term Type or Payment Term Days.
What is the difference between Save Draft and Approve?
Save Draft keeps the invoice editable with no number. Approve gives it the next invoice number and finalizes it.
Do I have to send the invoice right after approving it?
No. Close the Send Invoice dialog and click Send on the invoice page whenever you are ready.
Send VAT compliant invoices in minutes
Create professional invoices and credit notes, track who has paid, and connect invoicing with VAT and accounting in one platform. Start free, FTA accredited.